
A domain from another registrar
Move the DNS of a domain you already own to Cloudflare, then put your booking website on it.
Many hotels already own their domain, bought years ago at GoDaddy, Namecheap, IONOS or a local company. You don’t need to move the domain itself. You only hand its DNS, the address book that says where your website and your email live, to Cloudflare. It’s free, it’s fast to edit, and the Hoteliera records then work the same as for a domain bought on Cloudflare.
Hands-on
Add the domain to Cloudflare
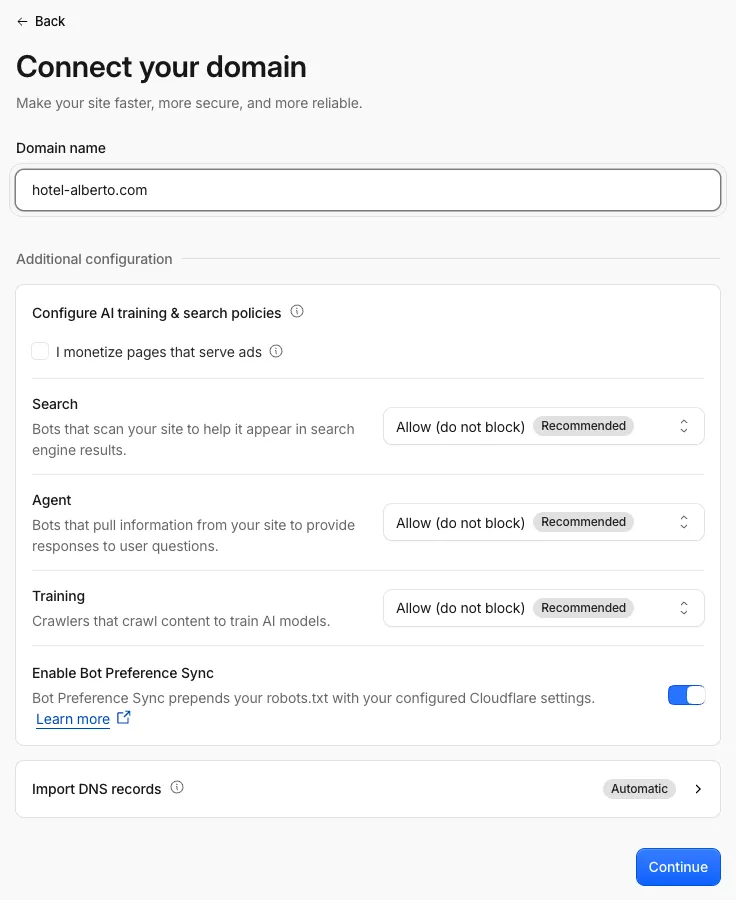
- Create a free account at dash.cloudflare.com and confirm your email address.
- Go to Domains › Overview, click Add domain, then Connect a domain. Type the domain without
www(hotel-alberto.com) in Domain name, leave Import DNS records on Automatic so Cloudflare copies your existing records, and click Continue. - Pick the Free plan and continue.
- Cloudflare lists the records it found. Check that your current website and, above all, your email records (MX, plus the TXT records for SPF and DKIM) are there. Anything missing stops working once you switch, so add it now.
- Cloudflare then shows two nameservers, with names like
anna.ns.cloudflare.comandbob.ns.cloudflare.com. Copy both, exactly as shown: yours will be different.
Turn DNSSEC off first
If DNSSEC is on at your registrar, turn it off before you change the nameservers, or the domain stops answering for everyone. Wait until the registrar confirms it’s off, then continue. You can turn DNSSEC on again later, from Cloudflare, once the domain is Active.
Change the nameservers at your registrar
Pick your registrar. Each tab follows its official help page; menus change now and then, so the link is there if a label looks different.
GoDaddy
- Sign in and open your Domain Portfolio.
- Select the domain to open its Domain Settings.
- Select DNS, then Nameservers.
- Select Change Nameservers, then I’ll use my own nameservers.
- Enter the two Cloudflare nameservers, select Save, then Continue.
- If the domain has Domain Protection, GoDaddy asks for a verification code first.
DNSSEC: DNS › DNSSEC › Turn Off DNSSEC, then Remove. It can take up to 90 minutes to show.
Official help: Change my domain nameservers · Turn DNSSEC on or off
Namecheap
- Sign in and select Domain List in the left sidebar.
- Click Manage next to the domain.
- In the Nameservers section, pick Custom DNS from the dropdown.
- Enter the two Cloudflare nameservers.
- Click the green checkmark to save.
DNSSEC: on the same domain, open the Advanced DNS tab and switch the DNSSEC toggle off.
Official help: How to change DNS for a domain · Managing DNSSEC (Custom DNS)
IONOS
- Sign in and open your list of domains.
- In the domain’s row, click the gear icon under Actions and select Name Server.
- Select Use Custom Name Servers.
- Enter the Cloudflare nameservers in Name Server 1 and Name Server 2.
- Click Save.
DNSSEC: in the domain’s DNS settings, click Disable in the DNSSEC section. IONOS says it takes at least 8 hours to update everywhere.
Official help: Using your own name servers for a domain · Setting up and managing DNSSEC
Wait for Active
Back in Cloudflare, the domain shows as pending until it sees the new nameservers. Most changes go through within an hour; registrars allow up to 24 hours, sometimes 48. Cloudflare checks on its own and emails you when the domain is Active.
Connect it to Hoteliera
From here the steps are the same as in Your own domain with Cloudflare, where a clip shows them:
- In Hoteliera, go to Settings › Websites, open your website and pick the Domain tab. Under Own domain, switch on Active, type
hotel-alberto.comand click Activate domain. - At the bottom of the page, DNS records for your domain shows two records with their targets.
- In Cloudflare, under DNS › Records, add both as CNAME records,
wwwand@, each with its own target, and set Proxy status to DNS only (grey cloud). - Back in Hoteliera, click Check again until the status reads Active.
See the effect
The Cloudflare overview of the domain switches to Active. After you add the two records, Hoteliera issues the certificate on its own, usually within the hour; Check again shows Active, and https://hotel-alberto.com opens your booking website with the padlock. Your email keeps working, because its records moved to Cloudflare with everything else.
See Hoteliera in action
Free PMS forever. Book a 15-minute demo and see how it fits your property.
Request a demo